Showing posts with label Tile install. Show all posts

Sunday, August 14, 2011

Should I add electric floor heat in my bathroom?


      Tile floors can be shockingly cold to the feet during the cold Winter mornings.  If this is your case then adding electric floor heat will dramatically improve the comfort of your bathroom or any tile floor.
      Here are a few questions to help decide on heating your floor?
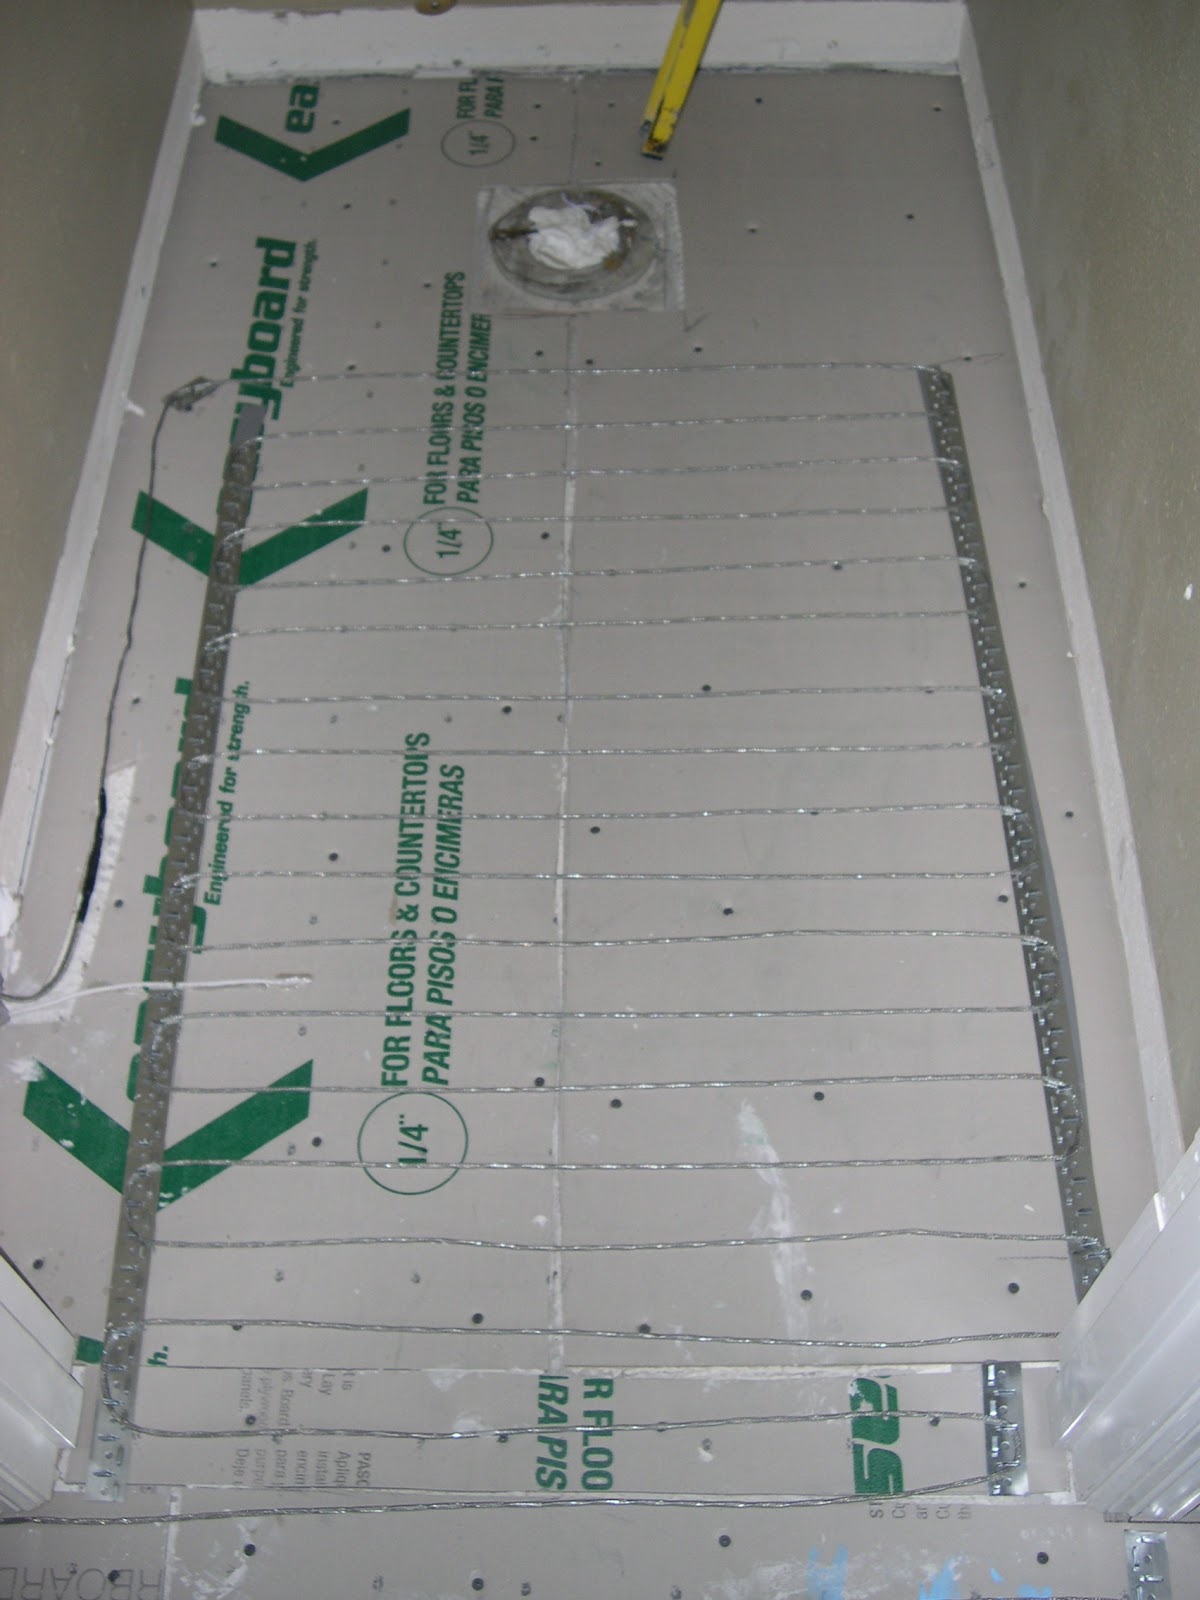
    1. Is there room in your electrical panel to add a circuit?  Read the specs on the system you are using to see if it will require 120v or 240v.
    2. Is your floor square or oddly shaped and chopped up?  If you have separate chopped up spaces then you made need the system that uses a continuous wire to place throughout the floor as needed.
    3. Is the bathroom generally colder than the rest of the house?  The continuous wire system can have a gap as little as 2″ between each strip of wire as in the photo above which puts out a little extra heat for the space.
    4. Do you want to warm the tile floor of your shower or the tile around your bathtub? There is a special wire to order for wet locations.
    5. How accessible is it to run new wire from the electrical panel to the area you are installing the system?  Typically this would be the attic or crawl space.
    6. Where would you place the thermostat? I suggest hiding it if possible, once you set the timer you will likely not use it often.
      The images show the wire system in a West Linn master bathroom remodel which provides very flexible placement. You can see where it stops in the front of the toilet as your feet never touch behind it, although it is capable of being distributed evenly along small chopped up spaces, angled and curved walls.


      Have a patio that gets used year round? Adding floor heat is possible outside.

      Sunday, July 17, 2011

      Home Improvement under $1000 #2

      Dress up your front entry or patio with tile on the floor. This photo is the entry outside of a front door but can be just as easily done inside. This is a natural slate which is good to use for an entrance as it shows less dirt that builds up and get tracked in. This can all be done for under $1000 depending on size, tile, and preparation. Be sure to select a dark grout that will not show stains and seal the whole surface with an appropriate sealer.

      Monday, July 11, 2011

      4 tips to reduce maintenance for your tile entry

      Thinking of installing tile on the floor for the entry in your home? Here are a few must know tips.


      1. Select a color or tone that is similar to the elements (dirt) outside of your house. This will reduce aging the tile from stains and decrease the amount of maintenance.   
      2. Grout color should resemble and compliment the color of the tile. If the tile has variation then match the grout to the darkest and most prominent color of the tile to minimize visible stains. 
      3. If a lot of dirt gets tracked in then look at tiles larger than 12"x12". This will reduce the amount of grout that is a pain to clean and may discolor.
      4. Finally, if you have installed a Granite, Marble, or Slate tile then seal everything especially the grout with an approved sealer. If a porcelain or ceramic tile has been installed the hardened surface will prevent stains but the grout still needs a sealer. 
      A good sealer will be at any tile store and be sure to read the instructions before application.

      Saturday, July 9, 2011

      Before your tile is installed make sure......

        Getting tile to look good takes more than just an experienced tile installer. It all begins with framing the walls perfectly and making sure the floor is level. If the floor and walls are not prepared properly an expert installer will have difficulties setting the tile and the end result may not look good. The following tips will help a finished product look perfect.
        Floor tile: When installing tile on the floor be sure the surface is level and smooth before laying down the Hardibacker. Something as little as one nail head protruding could throw off the whole install leaving tiles uneven. If the floor is beyond repair by using shims then consider using a self leveling compound to smooth out any imperfections.
        Wall tile:
      1. If you have the walls stripped down to old studs or building a new wall check how straight the walls are with a level or straight edge, square and tape measure. Each stud should plane evenly on the side where you will be attaching the backer board. If not then adjust the framing member by moving it, trimming it, or adding furring strips.
      2. Next, each perpendicular surface should be square. Or the degree it was intended to be, 45, 22.5 etc. If not then adjust the Framing members again by moving, trimming, or shimming them. Again check that the studs plane out evenly.
      3. Lastly before attaching the backer board check the walls (or studs) with a 4' level if they are plum. If the walls are plum your tile will look square, straight, and professional. Otherwise you will be trying to fit square tiles onto a wall shaped like a trapezoid and have grout lines that look unlevel.
      4. One extra tip before laying tile - I always inspect the tile for different thicknesses and make sure they are square, sometimes they vary in size and shape. This is only becomes troublesome when your grout joints are tight leaving little room for any adjustments. If you find the tiles to be inconsistent then make your grout joints 1/4" or larger depending on the variations.