Showing posts with label Portland remodeling. Show all posts

Sunday, October 16, 2011

The right garbage disposal


Are you looking for a new garbage disposal before the holidays? The Brand I always recommend is the In-SinkErator Evolution series. The Essentials 3/4 horse works great but you like your power there is a 1 horse called Evolution Excel. They are both quiet, easy to install and I have put many of the In-SinkErators in kitchen remodels.

Good luck and happy grinding.

http://www.insinkerator.com/product/selector.php

Friday, October 14, 2011

Clackamas County toilet rebate

Clackamas Country residents are eligible for a $100 rebate when replacing their old toilet with a new 1.28 gpf Water Sense certified toilet. Below is a link for the guidelines and application.

http://www.clackamasproviders.org/images/stories/CRWP_rebate2010.pdf

Sunday, August 14, 2011

Should I add electric floor heat in my bathroom?


      Tile floors can be shockingly cold to the feet during the cold Winter mornings.  If this is your case then adding electric floor heat will dramatically improve the comfort of your bathroom or any tile floor.
      Here are a few questions to help decide on heating your floor?
    1. Is there room in your electrical panel to add a circuit?  Read the specs on the system you are using to see if it will require 120v or 240v.
    2. Is your floor square or oddly shaped and chopped up?  If you have separate chopped up spaces then you made need the system that uses a continuous wire to place throughout the floor as needed.
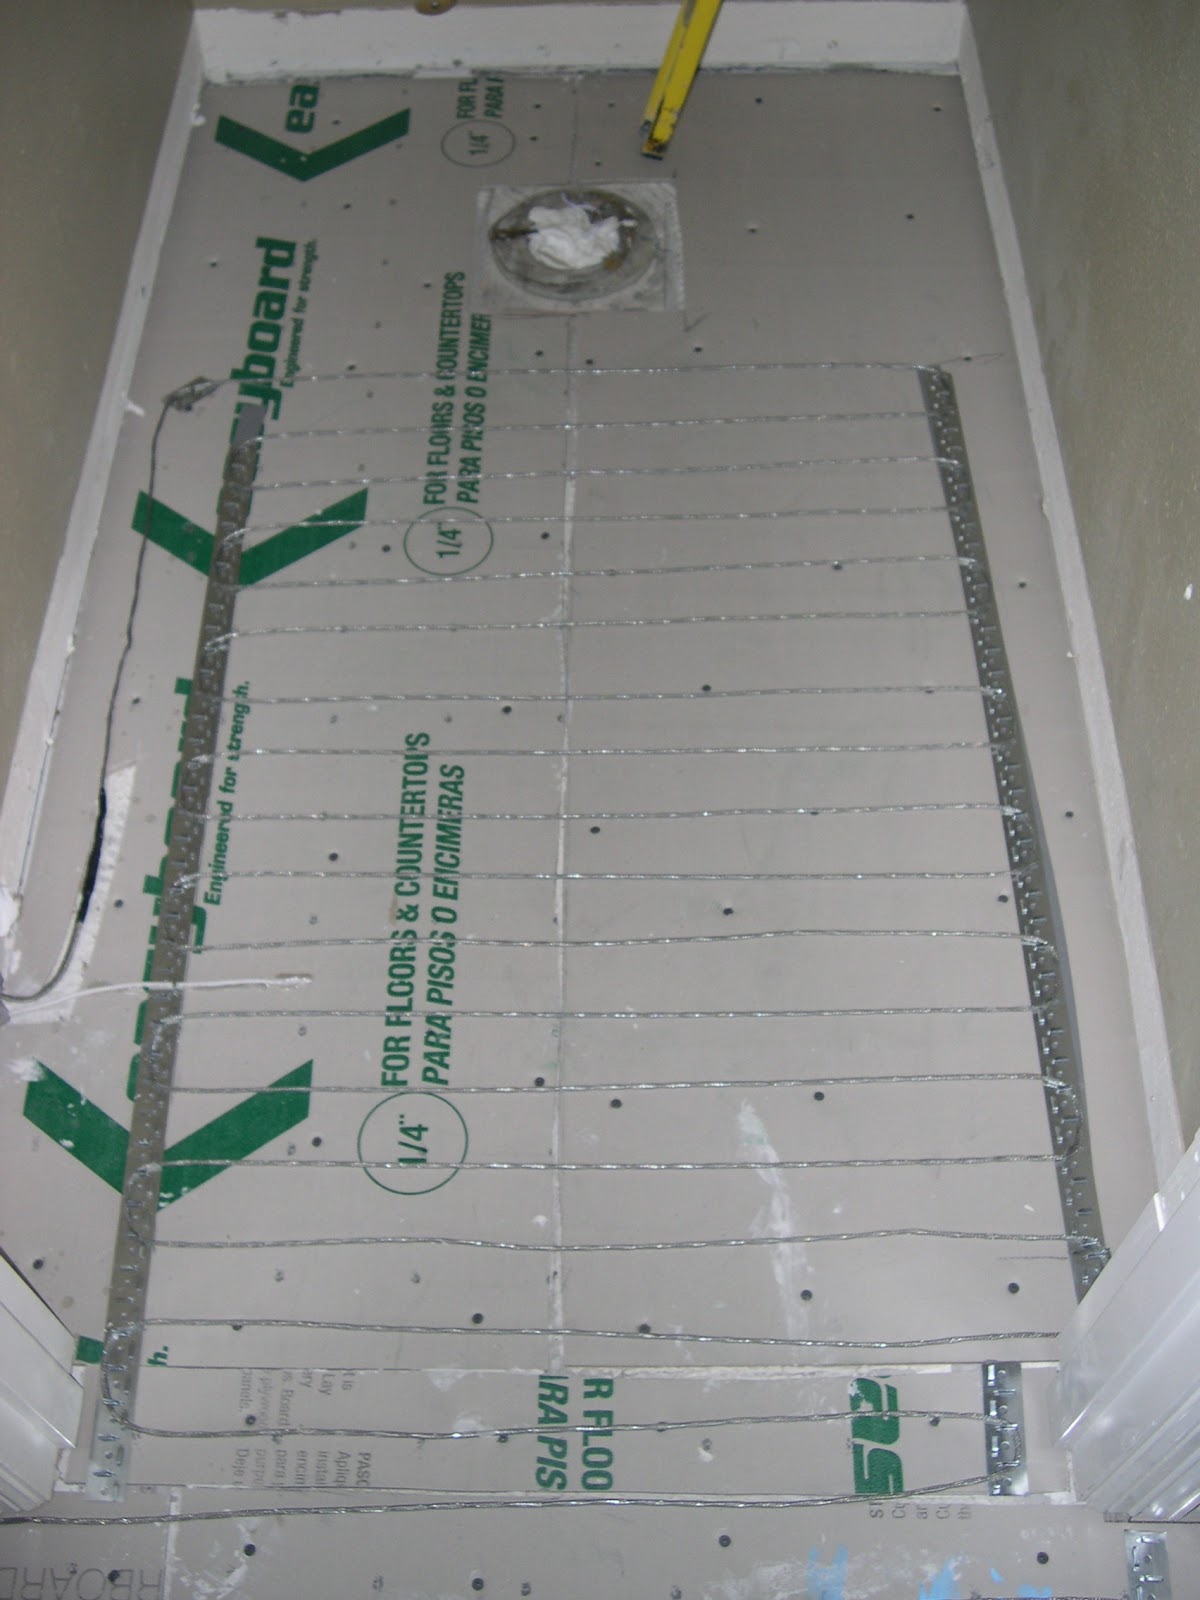
    3. Is the bathroom generally colder than the rest of the house?  The continuous wire system can have a gap as little as 2″ between each strip of wire as in the photo above which puts out a little extra heat for the space.
    4. Do you want to warm the tile floor of your shower or the tile around your bathtub? There is a special wire to order for wet locations.
    5. How accessible is it to run new wire from the electrical panel to the area you are installing the system?  Typically this would be the attic or crawl space.
    6. Where would you place the thermostat? I suggest hiding it if possible, once you set the timer you will likely not use it often.
      The images show the wire system in a West Linn master bathroom remodel which provides very flexible placement. You can see where it stops in the front of the toilet as your feet never touch behind it, although it is capable of being distributed evenly along small chopped up spaces, angled and curved walls.


      Have a patio that gets used year round? Adding floor heat is possible outside.

      Monday, August 8, 2011

      Salon remodel in the pearl dist.

      Here is an image I took with my IPad app called 360 Panorama. Such a great app.

      This salon I remodeled was a fun project. Since it is a rented retail space we were limited to what we could do with the given space as is but fortunately there were enough electrical circuits for us to use for the hair dryers, water heater, lights, microwave, mini fridge, and coffee pot.

      I highlighted the retail shelves that I built with a halogen track light. I also flooded the space with pendant lighting and wall sconces. Painting the 12' ceiling black added a dramatic difference in how the space felt. Not only did the black give this room a rich look but it visually enlarged the space.


      Saturday, July 23, 2011

      Transforming old Oak cabinets into a beauty.


      Here is a photo of where I am giving a distressed look to some cabinets. This is a cheap way to add beauty and character to your old kitchen or bathroom without investing in new cabinets.

      There are many ways to do this and the key is to remember that the less you try at it the better it will look. Most cabinet companies offer this as a finish option for new cabinets which costs even more than standard finishes. It has become a popular look in many million dollar homes.

      As you can see in the photo I have painted black over the existing cabinet (but can be any color). Then with only 150 grit sand paper I am sanding down the surface to achieve the antique look. I sand with the grain of the wood being careful to only burn through the edges a little to highlight the profile of the door adding depth to the overall look. I have also exposed the original surface in small areas to add character.

      Some tips:
      For a real aged look strike the wood with a sock full of nuts and bolts or rocks.
      Be sure the base layer is a contrasting color to the top surface for best highlighting results.
      Can be done with paint or stain.
      Add some contrasting handles and knobs.
      Replace the old drawer guides with full extension bearing guides.

      Tags, remodel, remodel on a budget,  kitchen design, 

      Tuesday, July 19, 2011

      When was the last time you went in your attic?

      5 things homeowners need check in the attic.


      1. Bath exhaust fan Your exhaust fan should have a duct run from the fan to a vent in the roof. Often the duct will be connected to it's own vent and sealed. This is important to check since your fan's job is to exhaust all the moisture. You don't want moisture from the shower blowing into your attic causing mold to grow. 
      2. Insulation Your attic should have enough insulation that you cannot see any joists that hold the ceiling up. The recommended R-value is up to or over R-60. This means you should have blown-in insulation about 20" deep. 
      3. Roof vents Your attic needs to breath. It gets hot and cold throughout the day and year. Condensing moisture needs to escape and air needs to circulate to maintain constant temperatures within the house. Your attic should have vents toward the top of the roof or along the ridge and one every so often at the bottom of your roof where the framing sits on the exterior walls. These will have screens on them and are often called bird blocks. They should not be cover from insulation.
      4. Heating and cooling ducts If you have ducting in your attic for your heating and cooling system check that they are wrapped with insulation to help the system work more efficiently. They should also have no leaks that blow air into the attic space. Same applies to the crawl space. 
      5. Discolored sheeting  Inspect the plywood where visible for discoloring. There should be no signs of moisture build-up or leaks. If you don't see any leaks in your house this doesn't mean they don't happen. Water can run down a vent pipe in your wall to the crawl space and rot away everything out of sight without ever knowing. Call a roofing expert if there are signs of leaking.

      This inspection should only take 20-30 min. Put it in your calendar to do for this weekend. 

      Does your attic not ventilate well? Install an attic fan on a thermostat that circulates air from the outside.

      Home Improvement under $1000 #3

      Home improvement for under $1000 #3. Add a framed mirror and sconces for lights instead of a light bar over the mirror. This will allow a taller mirror giving the illusion of taller ceilings. Lighting quality is better on the face minimizing shadows and casting an even distribution of light on your face.

      Sunday, July 17, 2011

      Home Improvement under $1000 #2

      Dress up your front entry or patio with tile on the floor. This photo is the entry outside of a front door but can be just as easily done inside. This is a natural slate which is good to use for an entrance as it shows less dirt that builds up and get tracked in. This can all be done for under $1000 depending on size, tile, and preparation. Be sure to select a dark grout that will not show stains and seal the whole surface with an appropriate sealer.

      Friday, July 15, 2011

      Home Improvement under $1000 #1

      This before and after is a project that cost just over $500 for the home owner. They needed a set of steps to safely get to the fire pit they had built below their house. Next phase will include replacing the cinder blocks shown and add one more step at the top. Then spread bark dust beyond the rocks.

      Wednesday, July 13, 2011

      Concrete calculator

      Here is a simple tool to figure how much concrete you need to order or how many bags you will need to purchase.

      Add comfort to your patio year round.

      If you love hanging outside on your patio but are limited to only the summer months then these remodeling tips will help you enjoy a year round outdoor living room.


      1. First the are needs to be covered. If there is no cover then build a roof over the area to protect from rainfall. This will also aid for shade in the summer. Many different covers and roofs can be built. Anything from a retractable awning to a dormer or shed roof. 
      2. If you have a concrete surface implement an electric floor heating system and tile over the surface for a classy look. This provides a warm surface for your feet so you can leave your shoes in the closet. It is amazing how the ground surface temperature alone can warm the body.  
      3. Now think of adding a popular inviting item that people will congregate around, fire. Build a fireplace or fire pit and you've got the best outdoor livable entertaining hang out in the neighborhood. Whether it be gas or wood burning be sure to ventilate it properly when built under cover. Is a fireplace out of the budget? Patio heaters do a wonderful job producing heat and creating a comfortable hangout. 
      Spice up the warm patio with built in speakers, comfortable furniture, flat screen TV, and games like a dart board. ENJOY!

      tags: remodeling patio, outdoor living space, heated floors.

      Monday, July 11, 2011

      4 tips to reduce maintenance for your tile entry

      Thinking of installing tile on the floor for the entry in your home? Here are a few must know tips.


      1. Select a color or tone that is similar to the elements (dirt) outside of your house. This will reduce aging the tile from stains and decrease the amount of maintenance.   
      2. Grout color should resemble and compliment the color of the tile. If the tile has variation then match the grout to the darkest and most prominent color of the tile to minimize visible stains. 
      3. If a lot of dirt gets tracked in then look at tiles larger than 12"x12". This will reduce the amount of grout that is a pain to clean and may discolor.
      4. Finally, if you have installed a Granite, Marble, or Slate tile then seal everything especially the grout with an approved sealer. If a porcelain or ceramic tile has been installed the hardened surface will prevent stains but the grout still needs a sealer. 
      A good sealer will be at any tile store and be sure to read the instructions before application.

      Saturday, July 9, 2011

      Before your tile is installed make sure......

        Getting tile to look good takes more than just an experienced tile installer. It all begins with framing the walls perfectly and making sure the floor is level. If the floor and walls are not prepared properly an expert installer will have difficulties setting the tile and the end result may not look good. The following tips will help a finished product look perfect.
        Floor tile: When installing tile on the floor be sure the surface is level and smooth before laying down the Hardibacker. Something as little as one nail head protruding could throw off the whole install leaving tiles uneven. If the floor is beyond repair by using shims then consider using a self leveling compound to smooth out any imperfections.
        Wall tile:
      1. If you have the walls stripped down to old studs or building a new wall check how straight the walls are with a level or straight edge, square and tape measure. Each stud should plane evenly on the side where you will be attaching the backer board. If not then adjust the framing member by moving it, trimming it, or adding furring strips.
      2. Next, each perpendicular surface should be square. Or the degree it was intended to be, 45, 22.5 etc. If not then adjust the Framing members again by moving, trimming, or shimming them. Again check that the studs plane out evenly.
      3. Lastly before attaching the backer board check the walls (or studs) with a 4' level if they are plum. If the walls are plum your tile will look square, straight, and professional. Otherwise you will be trying to fit square tiles onto a wall shaped like a trapezoid and have grout lines that look unlevel.
      4. One extra tip before laying tile - I always inspect the tile for different thicknesses and make sure they are square, sometimes they vary in size and shape. This is only becomes troublesome when your grout joints are tight leaving little room for any adjustments. If you find the tiles to be inconsistent then make your grout joints 1/4" or larger depending on the variations.

      Wednesday, July 6, 2011

      Vacuum without the allergies

        Central Vacuum Systems
        Most house hold vacuums just blow the dust around which makes it difficult to capture all the debris that becomes airborne. Many don’t even have a HEPA filter to contain the particles that irritate those of us with allergies. Central vacuums can help reduce these problems and may cost less to install than you think.
        Central vacuum systems may minimizing in home allergies by directing the debris out of the room you are vacuuming through hoses in your wall. These systems can be installed in new and existing homes. There is a canister typically located in the garage or accessible attic space where all the debris is captured with a HEPA filter. Inside the house there are locations low on the wall where you connect your hose and accessories, they look much like an electrical outlet.  There is no longer the need to lug around a large vacuum up and down the stairs.  There is also a device that can be installed on the bottom of the wall or under a cabinet so you can just sweep to it and vacuum the debris up rather than messing with a dust pan.
        Benefits to this handy system
      1. Light weight and smaller
      2. Easy to use
      3. Minimizes in home allergies
      4. Reduces airborne dust and debris
      5. Less noise
      6. Designed to last
      7. Improves the resale value of your home


      Tuesday, July 5, 2011

      Ask Angie: Loose shower grout - KansasCity.com

      Ask Angie: Loose shower grout - KansasCity.com

      A good article from Angie's list on why your grout may be falling out. There are some good points listed in this article to get it done right the first time.


      http://www.kansascity.com/2011/07/04/2992454/ask-angie-loose-shower-grout.html

      Thursday, June 30, 2011

      Is your shower pan leak proof? 5 popular pan methods

      Ask your contractor the method they use. There are several shower pan methods and you want to ensure yours will last and never leak. Each method can have a different look so to better understand the vocabulary of shower pans I have listed some descriptions below. Each pan has a critical criteria to provide proper drainage and prevent future leaking. An experienced licensed professional is recommend for each application.

      1. Mud set shower pan- This pan is very common and uses a rubber liner over a sloped mortar bed directing moisture to the drain. This is used in many cases where a prefabricated pan will not fit because of the custom size shower. This method gets finished with a tile of choice for a custom looking shower.

      1. Wedi systems or Schluter Systems- These systems are presloped water proof rigid panels that can be cut to fit any shower size. Material tends to cost more but labor can be less since it is a quicker and a simpler process. These are becoming popular because of the versatility with linear drain styles and curbless options for wheelchair access and modern design. This method also gets finished with a tile of choice and has prefabricated panels that accept custom drains for that contemporary look. 

      1. Tile ready pan- Simple, quick, and durable. Designed to be waterproof and mold resistant they are however limited to certain sizes.  Plan accordingly and check that the sizes will work for you. I recommend purchasing these pans and having them on site before framing the shower. These pans have a built in curb and splash around the edges for a leak proof system. They are provided with an epoxy to set the tile for ensuring a good bond to the acrylic surface.

      1. Fiberglass or Acrylic- This method is good if you are looking for a less expensive solution since it is a prefabricated pan that does not accept tile. That is right, this is the least expensive route and works great if you are not looking to put tile on the floor of your shower. You can however still tile the walls with the proper preparation and get that tile shower you are looking for.

      1. Corian-  A certified Corian fabricator can custom build a pan and walls out of Corian if you prefer to have a shower with no grout and still a choice of several colors. While this method seems maintenance free the pan tends to be slick. I suggest adding a decorative mat to prevent any slipping.


      After the pan is complete the walls must be prepared with mold resistant board (concrete board, Hardie Backer, or other approved board for showers) and sealed properly. Tile in wet locations should never be installed over Sheetrock. The moisture will breakdown the Sheetrock and build up mold and possible rot inside the wall.

      Tags: Tile installer, Portland bathroom remodel, shower repair

      Sunday, June 26, 2011

      West Linn marble shower in 35 seconds

      3 low cost bathroom remodel ideas

      If you are one who does want to spend $20,000 or $30,000 on a bathroom remodel but would still like to have a change and update the look then here are a few quick things we can do to help.

      1. The floor: Floors take a beating and for little cost can be replace with a new surface such as tile, cork, or marmoleum. There is a lot to choose from and can be overwhelming so ask yourself what colors you like, is maintenance an issue, and how much do I want to spend?

      2. Eye level: Change the mirror and light fixtures. Many times I have sent a client to an art frame shop to pick out a nice looking frame to put a mirror in. There are many selection to choose from but if none are jumping out at you then a custom frame can be built from mill work you see on doors and windows or even crown molding, then painted or stained to your hearts desire. Also, there are several light fixture styles out there to correspond nicely with the mirror you picked out.

      3. Colors: Of course painting will always make a huge impact on the space. If lighting is dim then consider lighter warm tones that compliments the new floor. Remember contrast is good for adding excitement and detail. For example light tone floor with light color wall and a darker cabinet with dark light fixtures and mirror frame.

      Another bang for the buck and one more step to a full makeover is locating a granite fabricator who has remnants that will fit your counter.

      If interested in a low cost dramatic change from these three ideas contact me (Nathan Dunithan 503-650-3090) and you might be surprised on the cost. I will give you a free in home estimate.

      Sunday, June 5, 2011

      7 tips towards a stress free remodel.


      .
      1. The professional team you are working with must be able to communicate well and understand your needs wants and especially those don’t wants. That team should come highly recommended or have a good referral list to call.
      2. Research the vendors and subcontractors that the company uses. There must be a good working relationship and high level of quality work.
      3. The majority of the project should be planned and ordered before any work begins. Often times this requires a little exploring behind walls and crawl spaces.
      4. You must have well written details and plans so everyone has the same level of expectations. Pictures, drawings, and samples are the best way to know what to expect. Any changes should be well documented.
      5. Understand the schedule and who will be coming and going from your house. Pay special attention to when the water, gas, and electrical will be shut off and approximately for how long.
      6. Keep in good contact with the project manager during the process to follow how the schedule is coming along and understand any changes that may occur.
      7. Be sure the project will be kept clean and a safe working environment. Any non work related areas should be sectioned off with plastic or other protective barriers.
      .
      Here is a tip to make the process more enjoyable once work has started. Write a blog with photos about your project and share it with others to help pass the time. This also is a great way to record what is going to be hidden in the walls long after the project is complete.
      Please feel free to comment or ask questions about your remodeling process.